Water Sources: Installing a pipeline through a pond dam
This process is normally in preparation for the installation of livestock watering tanks and exclusion fences. Parts and equipment needed for installation are listed at the end of this section.
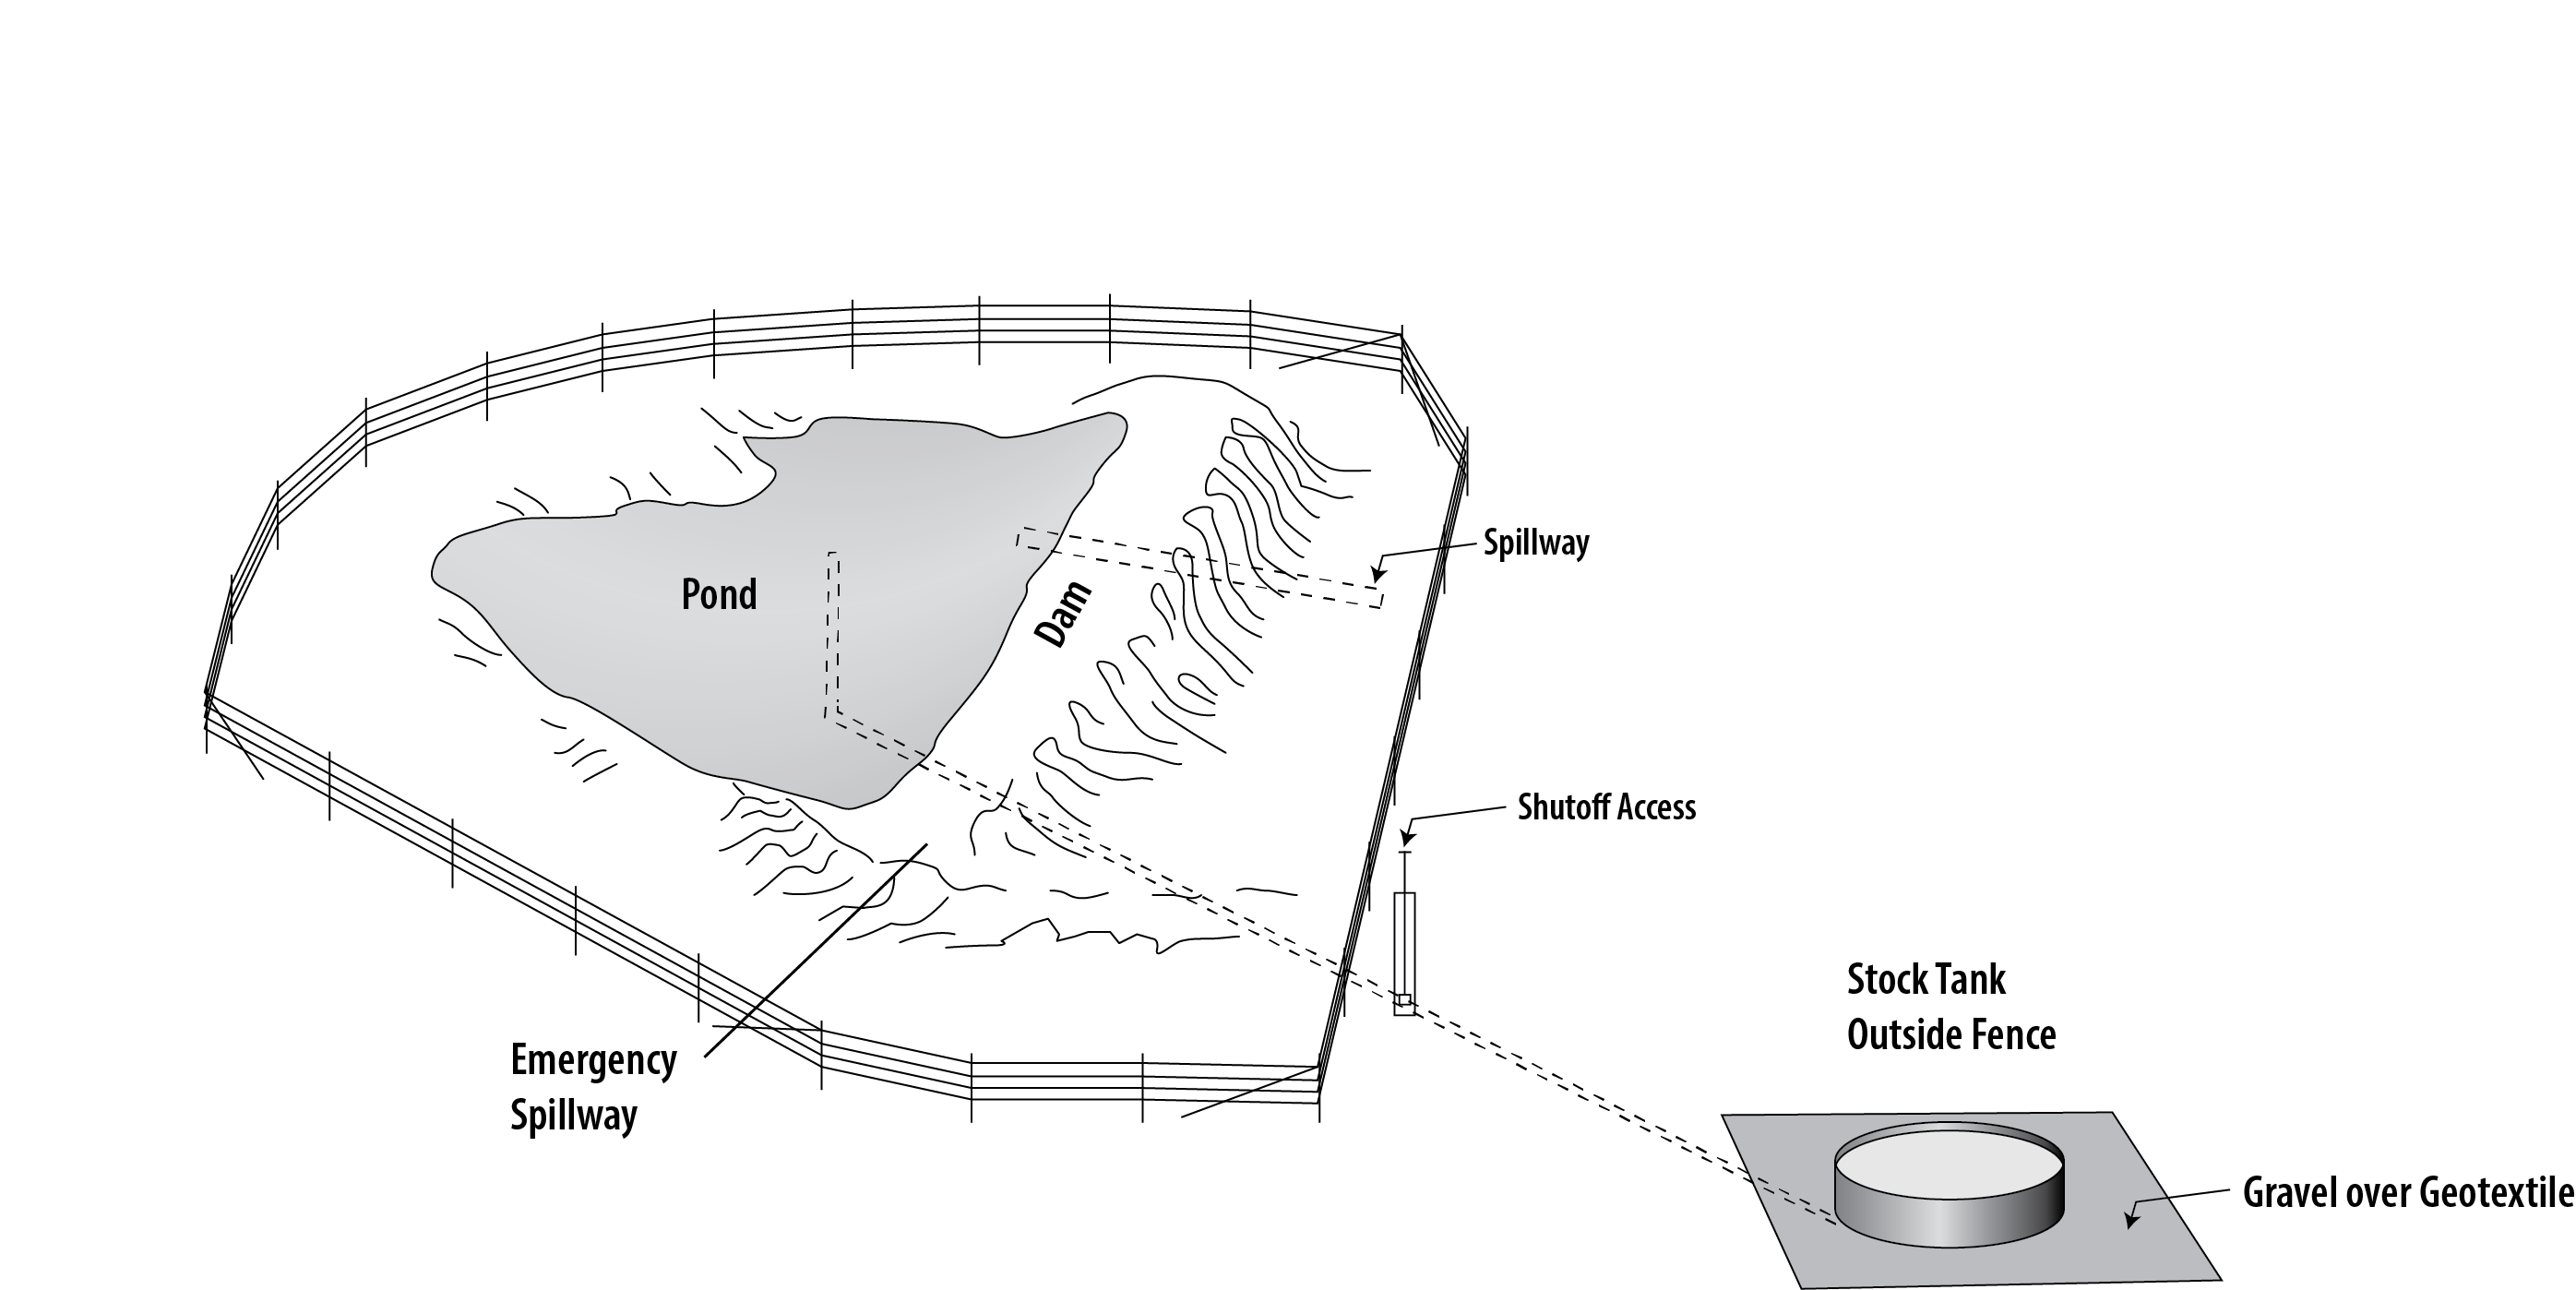
Before beginning any work, test the depth of the pond itself to see if it justifies the time and cost to develop the pond. Measure the elevations of the water surface, primary spillway, and emergency spillways. Compare those elevations with the possible site for a waterer below the pond. (A 6-foot differential is standard, but it is possible to install lines through ponds with as little as a 4-foot difference.) Finally, locate a contractor with proper equipment. Mini-excavators are generally not large enough to complete the installation because bottom slope of the pond is too flat. Large trackhoes are most frequently used. Backhoe tractors can also be used.
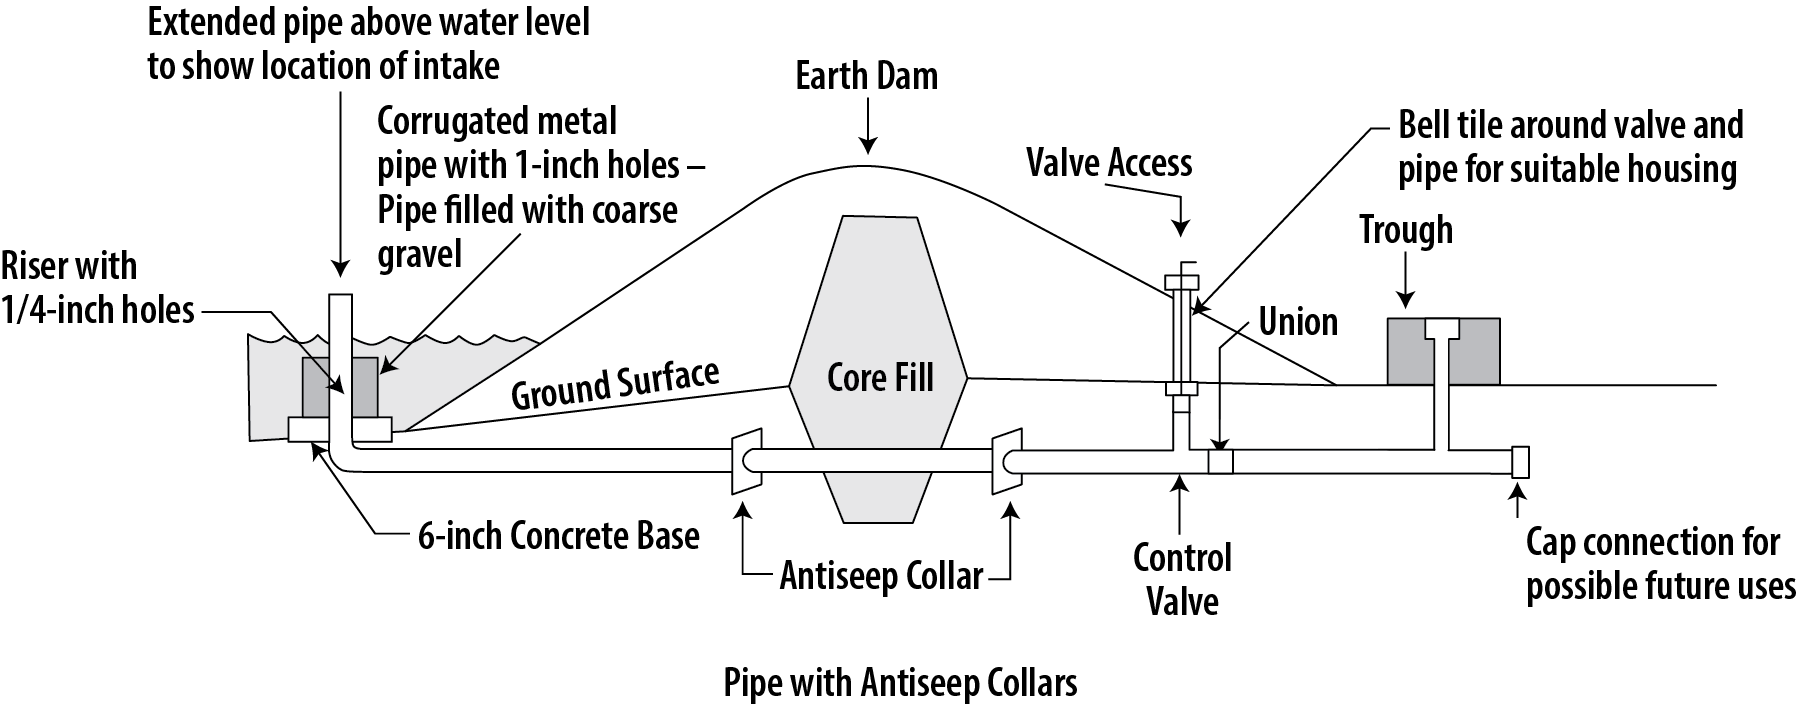
If the decision is to develop the pond, first prepare a riser (with holes) to be slid into the deepest part of the pond, leaving room for sediment accumulation below the lowest holes in the riser. Typically, the riser is made of the same PVC pipeline as the remainder of the pipe (1½ to 2 inch). Typically, the riser measures 6 feet, with 3/8-inch holes every 2 inches through both sides of the pipe from the top to about 2 feet from the bottom. Then the pipe can be rotated 90 degrees and another set of holes is put into the pipeline between the previous set of holes. The 2-feet-long “feet” are glued into the opposite ends on one of the PVC tees. A short piece of PVC pipe (3 inches) is glued into the third leg of the tee. The bottom end of the riser pipe can be glued into the third leg of the other PVC tee. The riser tee and the foot tee can be glued together so the riser will sit vertically; be sure to check it for close to plumb.
(NOTE: drill a 3/8-inch hole in the top of each foot to allow water to enter the riser system, without it, the pipe is difficult to sink into the water.)
Slide the riser into position with a line coming to shore where the line is to go through the pond dam. Use a two-inch “bell end” PVC pipe for this portion of the pipeline system. The final joint of pipe is ideally “gasket fit” pipe with the bell end toward the shore. These pipelines can be 40, 60 or 80 feet long to put the riser into the deepest portion of the pond. If desired, the pipeline can be floated over the trench by pulling about half the pipeline’s length onto the shore and inserting the plug (tapered end of gasketed pipe with cap) and then pushing the riser back into place.
Remove thefreeboard of the pond down to about 2 inches above the pond water level. The slot through the freeboard of the pond dam needs to be wide enough that the excavator can rotate without hitting any soil.
Create a trench from the shore to as far out into the pond water as the contractor can reach, plus a few feet into the dam itself. It is ideal if the trench can be 3 to 4 feet deep as it reaches the shoreline and the trench segment into the dam. The end of the trench in the dam should be as vertical as possible.
Align the pipeline and riser over the trench when the trench is clean of clods and mud. A rope or strap is placed around the pipe, so the pipe does not get lost or buried in the trench. When the pipeline aligns with the underwater trench, remove the plug from the end of the pipeline, and allow the pipeline to slowly fill with water. Replace the plug in the end of the pipeline one last time (it will be difficult to drive in as the pipeline is now full of water) and sink it into place at the bottom of the trench. A two-by-four with two 16d nails placed in one end spaced to straddle the pipeline is a good tool to guide the pipeline to the bottom and hold it in place while the contractor begins to build the seal and coffer dam.
Seal the pond. For assessing the pond materials, often the best material to initially place on the pipe in the trench is from the dam face along the shoreline of the pond. The best material is saturated and formed like modeling clay. No dry or loose material should be used in the coffer dam. The repeated process of packing and sealing the pond takes a few minutes. Do not worry about covering the entire pipeline out into the pond; the main area of concern is the area within 3 or 4 feet of the previous shoreline. Basically, the coffer dam and pipeline seal are being built in one step. Once the contractor has the seal to above the water level, the remaining water in the trench can be dipped and/or pumped out. The coffer dam construction can continue and be inspected for leaks.
Find theend of the pipeline. If well-formed saturated soils are used, the pipeline may be easily seen when the trench is pumped. If loose materials are used to build the coffer dam, construction requires a lot of manual digging because the mud seals flowing over the end of pipe must be removed from the trench. The rope on the end of the pipe is a guide to finding the pipe without damage.
Make certain the trench is sealed after finding the pipe. Often additional packing and sealing is needed. If the trench is sealed, the contractor can now trench the remaining distance through the pond dam. The contractor can dig the trench all the way to where the valve in the main line at the back of the pond dam is to be installed.
A section of pipeline is now assembled to the proper length and will include the shutoff valve. Place the assembled pipeline with the valve into the trench (with the valve in the open position). The gasket pipe joint lubricant is always recommended on the sharpened end of the pipeline. Have at least one additional person stationed to assist with pushing the pipes together, remove the plug from the pipeline through the dam with the riser (water will begin flowing) and promptly insert the pipe with the valve completely. Now insert thepipeline with the valve into the gasket end of the riser pipe. Allow the water to run through the pipe until it flows full. Slowly close the valve, otherwise the inertia (or water hammer) will push the gasket joints apart.
If an anti-seep collar is desired or required, it can be installed immediately behind the gasket fit junction. An alternative is to place a bed of bentonite clay under and over the pipeline for about 10 linear feet immediately after the pipe connection. Additional bentonite is added to the trench edges and bottom as the fill material is being added directly around the section of bentonite clay bedded pipe. The bentonite clay is added into the trench until the level is above primary spillway level.
If the pipeline is to be terminated at the valve, a 5- to 10-foot length of pipe should be glued onto the valve for connection later. The end of the pipeline can be capped – but not glued – to prevent dirt from getting into the line. Place a marker from the end of the pipe to the surface to mark where the end of the pipeline is located.
Place a valve protection well, similar to a meter well, over the valve to allow access from the surface. Test the valve once or twice to make sure it turns on and off completely and freely. Take care that the valve protection well is centered over the valve and in a relatively plumb position. The remainder of the trench can be re-packed, and the top of the dam reconstructed.
The process often requires about 4 hours of contractor time to complete. Typically, not more than 100 gallons of water is lost during this process.
Parts List
- tee (2)
- caps (4)
- ¼ turn valve
- valve protection well casing
- lid or cap for valve protection well
- 40-foot gasket fit pipe (2 joints, assuming 20-foot pipe sections)
(If gasket fit is not available, substitute a ¼-turn valve to replace the plug process.)
Additional Pipe
The length of pipe to be submerged in the pond water must be bell end, glue-fit pipe.
The remainder of the pipe may be bell-end, glue-fit pipe or gasket fit pipe.
CAUTION: if the pipe is purchased from a hardware store and has couplers to be glued on each end of the pipe, it may be labeled D&W (drain and waste), which is not acceptable.
Optional Materials for the Pond Sealant
- 8 or 10 bags of bentonite clay to use for a seal, or
- anti-seep collar (1)
Equipment Needed
- valve key (to turn on and off the water after the valve well is set)
- drill with 3/8-inch drill bit
- tape measure
- permanent marker
- saw to cut pipe
- gasket joint pipe lubricant
- PVC glue and PVC cleaner and/or primer
- rope (least 10 feet long)
- 8-foot 2×4 with nails or screws in place to hold pipe to bottom of trench
- round point shovels
- transfer pump with suction and discharge hoses
- container for water (to prime pump)
- mud boots
- extra set of clothing to wear after completing construction
